|
Create
a new document of any size and create a new layer. Use the Elliptical marquee tool and create a perfect circle (SHIFT+DRAG)
 |
 |
Next,
select WHITE as your foreground color and BLACK as your background
color.

Select click the RADIAL GRADIENT tool Drag from the top right corner to the bottom left so you get an effect
like mine.
Drag from the top right corner to the bottom left so you get an effect
like mine.
**IMPORTANT, DO NOT DESELECT YOUR IMAGE AT ANYTIME** |
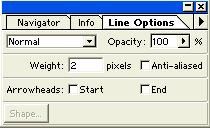 |
Create
a new layer choose a
light gray foreground color.
Double click on the LINE TOOL .
In the LINE TOOL option box use the setting to the left. .
In the LINE TOOL option box use the setting to the left. |
 |
Draw
a line across the middle of the circle. |
|
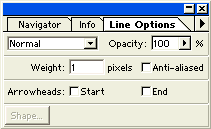
Next,
make BLACK your foreground color. Use the LINE TOOL again but
Change the settings to ONE pixel instead of TWO. On the same layer
draw a black line right above your gray one. This will create the
bevel where the screwdriver sits.
 |
 |
Use
the same line settings except make WHITE your foreground color and draw
a white line UNDER your gray line. |
 |
To
make it look slightly more realistic go to FILTER>BLUR>GAUSSIAN
BLUR with a setting of 0.5 (less blur for a sharper slot) |
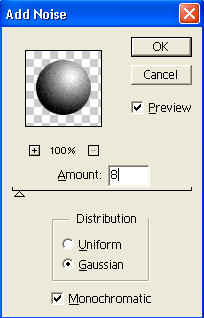 |
Lastly
we need to give some sort of texture to the gradient. So, Click on the
layer with the gradient on it and go to FILTER>NOISE>ADD NOISE |
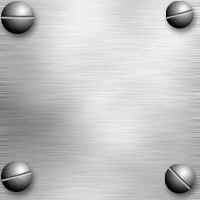 |
Your
now done. What's nice about this is now if you need to you can
rotate the screwdriver slot on the screw (EDIT>FREE TRANSFORM)
without also rotating the gradient layer. So you can have screws
face different ways, just as I have shown you here. You can also
size them down if you like. |